As an Amazon Associate, I earn from qualifying purchases with no additional costs for you.
Mineral identification is an integral part of work for both mineral collectors and scientists. Everybody wants to know what mineral they find during rock hunting, bought at a mineral show, or want to make research about. An approach to identifying minerals also varies for different types of stones and purposes.
Mineral identification is based on the testing of the physical properties and morphology of crystals. Luster, hardness, and color are helpful to identify minerals in the field. Geologists use electron microprobe, X-ray diffraction, and Raman spectroscopy to identify minerals on an advanced scientific level.
Some minerals can be easily identified at a first glance because of their unique properties, but others require state-of-the-art appliances. Today we are going to cover how to prepare your sample, how to choose the right method for diagnosis, what tools are needed for precise identification at home, and, as a bonus, how to identify the most common minerals. Prepare your samples – we are going to do some practical things today!
If you are interested in checking out the best books about rock and minerals identification you can find them by clicking here (Amazon link).
Create Your Mineral Identification Kit
A mineral identification kit is kind of a hand lab for geologists. If you work with minerals quite often, it is a good practice to have all the necessary instruments together. Mineral identification kits are available in online shops; however, it is quite easy to create your own kit.
A mineral identification kit is a set of instruments that allows testing of the various properties of minerals. The essential tools are copper wire, a pocket knife, a piece of glass, and a quartz crystal for hardness test; a streak plate, dilute HCl acid, UV light, a magnet, and a hand lens.
- Tools needed for hardness tests are non-mineral analogs of the Mohs scale members:
- Copper wire. Its hardness is around 3.5. This means that copper wire can scratch talc, gypsum, and calcite but cannot scratch fluorite.
Tip! Some sources can offer to use copper penny or copper coin. We offer to stick to the copper wire as a coin can be made of copper alloy with other metals, which distort the hardness, and also, different coins are used worldwide. So using copper wire is the best international option.
- Pocket knife. It is not necessary to have an expensive knife because, in this case, steel will be harder and can distort your measurements. A common inexpensive knife is the best option. The hardness of this tool is equivalent to 5.5 – 6.5 on the Mohs scale.
- A piece of glass. Glass hardness is around 5.5, so it lets us differentiate between apatite and orthoclase.
- A small quartz crystal. It is a very effective tool, as quartz is a common mineral, and it is easy to find an inexpensive well-formed crystal. Quartz hardness is 7, so it is helpful to understand whether a mineral sample is harder or softer than quartz on the Mohs scale.
- A streak plate. This tool is necessary for streak color identification. For example, it allows you to differentiate between gold and pyrite (fool’s gold). A streak plate can be any unglazed porcelain.
Tip! It is better to have a white and black streak plate for light and dark-colored minerals.
- Dilute HCl acid. This is the best tool to identify calcite, as a reaction between acid and mineral produces bubbles. It allows you to differentiate between calcite and gypsum or calcite and halite quickly.
- A magnet. Iron-bearing minerals can be identified and differentiated with the help of a magnet. Magnetite (iron oxide with the highest iron concentration) can attract metal pieces, pyrrhotite can be attracted by a magnet, and hematite does not react to a magnet.
- UV light. It’s an essential tool if you are looking for fluorite, calcite, and scheelite (tungsten ore).
- A hand lens. A hand lens allows you to check the form (habit) of tiny crystals and identify them (for example uvarovite garnet) or to check if faceted gemstones have any inclusions or fractures.
BTW: Do you want to know more about rock and mineral identification? The books listed below are the best ones you can find on the internet (Amazon links):
- Smithsonian Handbooks: Rocks & Minerals
- Gemstone & Crystal Properties (Quick Study Home)
- Ultimate Explorer Field Guide: Rocks and Minerals (National Geographic Kids)
Main Mineral Properties that Will Help You to Identify a Mineral
The mineral identification process is based on methodically checking the physical properties of minerals. The most significant advantage of these methods is that they can be easily held in the field, on mineral shows, or at home.
Mineral properties that are used for mineral identification are luster, hardness, color, transparency, streak, fracture, cleavage, specific gravity, magnetism, luminescence, reaction with hydrochloric acid, and morphology of crystals. Also, optical phenomena like birefringence and pleochroism can be tested.
So let’s check out the physical properties of minerals:
Color and Any Other Visible Optical Effect
Color is the first obvious property that we notice. Minerals can occur in any color, hue, saturation, and tone. No additional tools are needed to identify a color. The sample should be clean and not weathered.
TIP: Rock color is the first property we pay attention to. Do you know why rocks have different colors? Find out the complete explanation in the article below:
Rock Colors: What Determines Color & Why Different Colors
Luster
For luster identification, no additional tools are needed too. Minerals have metallic and non-metallic (adamantine, glassy, matte, oily, waxy, mother-of-pearl, iridescent, and silky) luster.
Transparency
Transparency is the degree to which light is transmitted through a mineral. To differentiate between opaque, translucent, and transparent minerals, you may need a flashlight and a piece of printed text.
Streak
The streak is the color of the mineral in a powdered state. Sometimes the color of the mineral sample and streak are different. This property can help you to identify some minerals very precisely. Use a streak plate or piece of unglazed porcelain for this test.
Cleavage and fracture
Cleavage is the ability of crystalline minerals to split along planes of weakness in the mineral’s structure, while the fracture is a characteristic of the surface that is left after the splitting of a mineral.
No additional tool is needed to observe these properties if you don’t want to destroy your sample. However, if you want to initiate a fresh cleavage of fracture, you may need a hammer and chisel or a steel nail.
Hardness
Hardness is a resistance of minerals to scratching. A relative hardness scale used in mineralogy is the Mohs hardness scale. To determine the hardness, you can use your fingernail copper wire, a piece of glass, a pocket knife, and a quartz crystal, as we have discussed in Create your mineral identification kit passage.
TIP: The advantage of the hardness test is that it can be easily done at home or even in the field while rockhounding. Check out the complete guide in the article below:
DIY Guide: Testing Mineral’s Hardness (Explained by Expert)
Specific Gravity
Specific gravity is the ratio between the mass (weight) of a mineral and the mass (weight) of an equal volume of water. In the field, it is determined only by weighing on the hand.
Magnetism, Luminescence, Reaction with Hydrochloric Acid
These properties are kind of exotic, and very few minerals have them, but they are crucial for minerals like magnetite, fluorite, and calcite, respectively.
Professional Mineral Identification
Today geologists use far more advanced methods to identify minerals. They mostly rely on chemical composition and crystal structure (atomic arrangement) rather than on physical properties.
Some methods are quick and non-destructive; others require powdering a part of a sample. Today it is possible to make precise identification of a few nanometers of mineral, which is invisible to the naked eye.
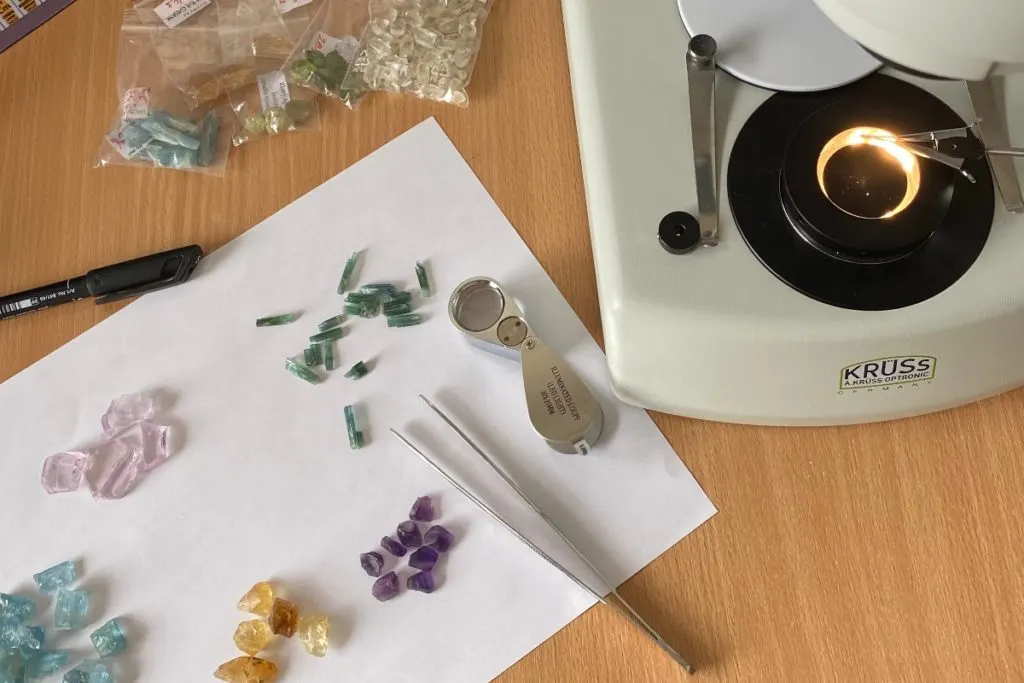
Professional geologists and scientists use refractometers, polarization microscopes, electron microprobe analyzers, X-ray fluorescence, X-ray diffraction, Raman, and Infrared spectrometers to identify minerals on an advanced level. Sometimes minerals should undergo a complicated sample preparation stage.
Sometimes it is quite easy to identify a mineral just by looking at it. For example, violet crystals of amethyst are quite obvious. It is harder when minerals are cut and flawless. They lack any crystal faces, natural fracture surfaces, and inclusions.
Also, it is unacceptable to destroy even a small part of a stone. That is why non-destructive spectroscopic methods are so important for gemologists.
Nowadays, any new mineral has been found under huge magnification (with the help of an electron microscope). It is a great exception when a new mineral is found in macro sizes. But miracles happen! The new material comes mostly from remote areas in Africa.
TIP: Every professional geologist do it. Licking rocks and minerals in geology is a common practice to define some kind of minerals and, of course, a bunch of fun. Find out more in the article below:
Licking Rocks in Geology: Why & How (Answered by Geologist)
How to Prepare a Mineral for Identification
One of the most underestimated steps in mineral identification is sample preparation. That is why we decided to start with this stage, as many mistakes occur here.
We are going to discuss why it is important and how sample preparation differs for fresh minerals from the field, tumbled stones bought from mineral shows, faceted stones, and minerals that are going to be studied by scientists.
Before the identification of minerals, the sample should be checked and prepared. The studied sample should be carefully cleaned with water and dried. No weathered or altered surfaces should undergo testing of hardness and streak. Check if your sample is an individual crystal, mineral aggregate, or rock.
The most important rule for sample preparation is to clean the stone no matter if it is just a freshly dug sample, tumbled opaque stone, or faceted sparkling gemstone.
You need to see a true color (not covered by clay from earth or dust from a shelf) and luster. For example, dust can lower the stone’s luster from glassy to resinous or waxy.
It may seem obvious that freshly dug stone should be washed, but it is important to clean even faceted stone because the grease from hands left on the stone facets can distort refraction index measurements.
Mineral hunters need to pay attention to the freshness of the sample. Weathered surfaces have other physical properties: color is lighter, luster is more dull or absent, hardness is lower, and the fraction is earthy. The weathered surface should be removed. Physical properties should be tested on fresh surfaces only.
After cleaning the sample, observe it attentively. Try to respond to the next questions:
- Does it look like crystals with well-defined faces? For example, a prismatic quartz crystal or octahedral magnetite.
- Is it composed of one kind of mineral? Is it mineral aggregate? Like chalcedony, turquoise or malachite.
- Is it composed of different minerals? If yes, it is a rock. Lapis lazuli is a rock composed of 3 different types of minerals (lazurite, pyrite, calcite). If you have a rock sample, pay attention to what mineral you are going to test for physical properties.
For rock hunters, it is very useful to pay attention to country rocks where the mineral is found. The type of country rock (sedimentary, metamorphic, or igneous) can narrow down possible candidates for identification.
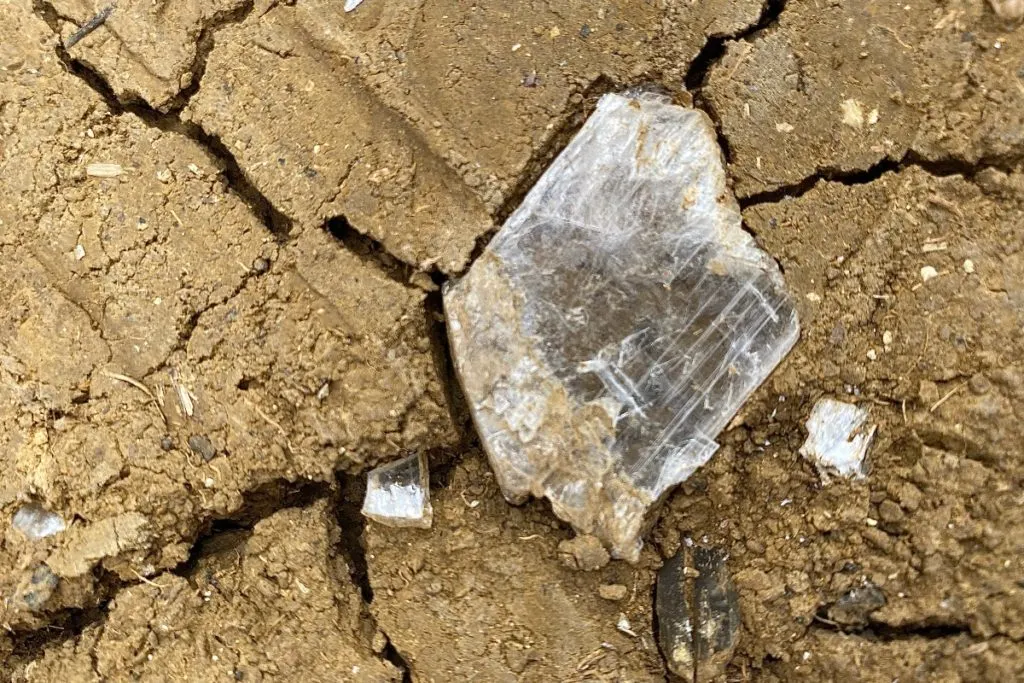
For example, if you have found white transparent crystals between fractures of clay, it will hardly be colorless topaz as it tends to pegmatite bodies. Most probably, it is gypsum or calcite. Check hardness and reaction to hydrochloric acid, and your identification is completed!
TIP: The best way to identify the mineral is to consult with a specialist or with a rocks and minerals book. Check out the best book for Identifying Rocks & Minerals in the article below:
5 Best Books for Identifying Rocks & Minerals You Must Read
Step-by-Step Identification of Mineral

Let’s move to the identification. Follow the next 14 steps to identify your mineral sample. It’s going to be an interesting journey.
The most prominent way to identify minerals correctly is gradual and methodical testing of all physical properties. Check the essential ones first: hardness, luster, transparency, color, streak, cleavage, and fracture. Further, proceed with magnetism, luminescence, and morphology of crystals.
Step 1: Protection
During the mineral identification process, don’t forget to use gloves to protect your hand and something resistible, like a rubber mat or wooden board, to protect a surface where a test takes place. (tabletop or a floor).
Step 2: Choosing a Strategy
There are two approaches to mineral identification to narrow down possible candidates.
- The first one is based on luster (metallic or non-metallic). In most cases, it will place the unknown sample into the sulfide or iron oxides group (metallic luster) or the silicate or halide group (non-metallic) luster.
- The second approach is based on hardness. An unknown mineral is tested by a piece of glass (5 on the Mohs scale) and then placed into a less than 5 hardness group or more than 5 hardness group.
These are just two possible options for the first step, and it doesn’t mean that in the case of luster identification, the hardness test should be omitted or vice versa. It’s just solving different tasks.
Step 3: Luster
No additional tools are needed to observe a luster. Metallic luster means a studied mineral belongs to the sulfide or iron oxides group. In the case of non-metallic luster, specify the type: adamantine, glassy, matte, oily, waxy, mother-of-pearl, iridescent, or silky.
Step 4: Hardness Identification (Scratch Test)
Hardness identification is one of the most important tests. It is based on a comparison if your mineral sample is harder or softer than a tool used for scratching (with an equivalent hardness to the Mohs scale standards).
To test the hardness of minerals, try to scratch a piece of glass. It allows you to understand whether your sample is harder or softer than 5 and gives you a direction on how to choose the next tool.
Should it be copper wire or quartz crystal? This strategy lets you save some time and not move from the softest to the hardest tool or vice versa.
TIP: A scratch test is an essential method of mineral identification. It is widely used because of its simplicity. Check out the complete guide in the article below:
Performing Scratch Test on Rocks (Follow These 8 Steps)
Step 5: Color Identification
To identify the color of the mineral, start with the most obvious color and then add a shade. For example, blue -> greenish-blue for aquamarine.
In the cases with bicolor or polychrome minerals like tourmaline or ametrine indicate two colors.
Step 6: Transparency
Transparency is also a quite obvious characteristic. In order to differentiate between opaque and translucent minerals, you can try to watch the sun through the stone or use a flashlight. Minerals with metallic luster (Step 3) are opaque in most cases.
Please, keep in mind that some minerals can occur as transparent and opaque, depending on the mineral formation process and environment.
Step 7: Streak Test
After completing the previous 5 steps, you already know what to expect from the streak test and whether it can be helpful in your situation or not.
- The streak test is a turning point in case the luster determined in Step 3 is metallic. The streak test allows differentiating between gold and fool’s gold (pyrite). Because of the discrepancy in the color of the mineral sample and the color of the streak, minerals like pyrite, sphalerite, galena, hematite, magnetite, and chromite can be identified and distinguished between each other.
- The streak test is important for minerals that can occur in different colors. For example, calcite and fluorite can be found in any color; however, the streak color will always be white.
- Even when we see that the streak test is inevitable and deciding for some minerals, it can be omitted for hard minerals (more than 6 on the Mohs scale), as the hardness of the streak plate is 5 -5.5. If you try to scratch a streak plate with a harder mineral, you can observe some line, but look closer, it is probably a scratch on the streak plate, and you observe a powder from the plate.
TIP: Minerals’ streak is one of the most important tests for mineral identification, especially while working with native metals and sulfide minerals. Check out the complete guide in the article below:
DIY Guide: Testing Mineral’s Streak (Explained by Expert)
Step 8: Cleavage and Fracture
Observe your sample carefully. If it is a perfect undeformed crystal, there is no visible cleavage and fracture. At this stage, you have to decide if it is acceptable to destroy part of the sample or not.
If you can see distinct cleavage directions or fracture surfaces, try to classify them. Perfect, good, fair, poor for cleavage and granular, earthy, conchoidal, splintery, stepped, and uneven for fracture.
Cleavage is an important property for the identification of micas (biotite, muscovite, fuchsite). Conchoidal fracture, for instance, is typical for quartz.
Step 9: Specific Gravity
Specific gravity (SG) depends on the chemical composition and structure of the mineral. In the field, it is determined only by weighing on the hand. If a mineral feels light (like gypsum), its SG is around 2.5 g/cm3. Heavy minerals like galena have SG of more than 5 g/cm3
The medium SG is more common (from 2.5 to 5 g/cm3 and is typical for silicate minerals like quartz and feldspars.
Step 10: Magnetism, Luminescence, Reaction with Acid
At this stage, you can test and observe some non-typical properties like magnetism, luminescence, reaction with hydrochloric acid, and optical phenomena.
Checking of magnetism is needed if, in previous steps, the color of a mineral is indicated as black, luster is metallic and specific gravity is determined as heavy. Magnetism can help to differentiate between magnetite (which attracts a magnet) and hematite (which doesn’t interact with a magnet).
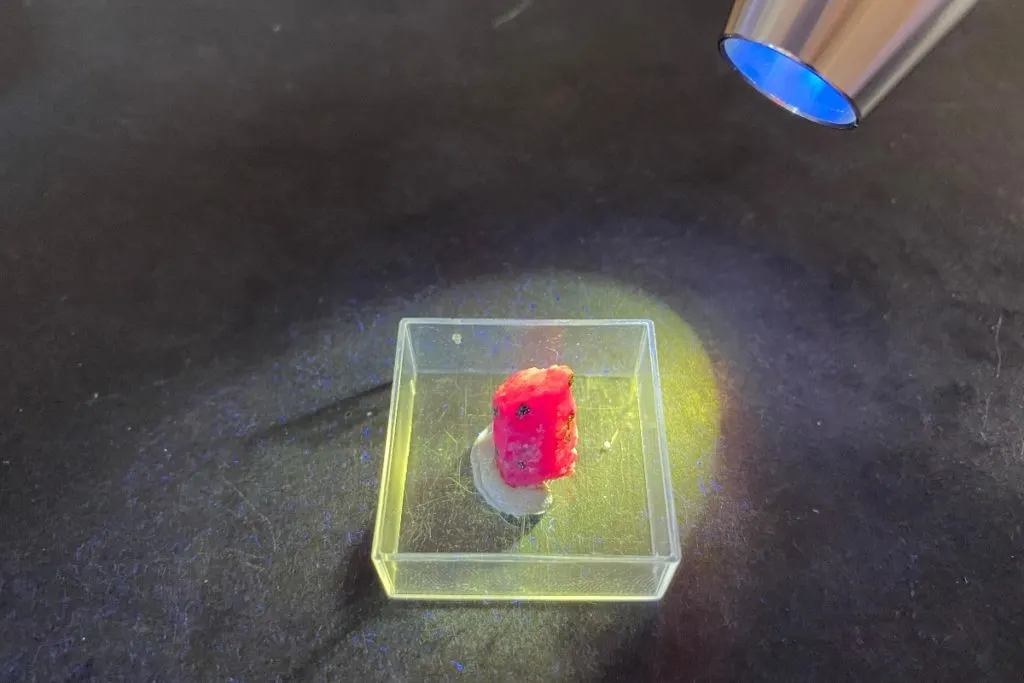
Luminescence can be tested with the help of UV light. Test your mineral in a dark room to obtain the best results. There is a list of minerals that glow under UV. The best examples are fluorite, calcite, corundum, scheelite, sodalite, and spodumene.
Reaction with hydrochloric acid can help you to identify calcite easily. After placing a few drops of dilute hydrochloric acid (HCl) on a surface of calcite, you will observe bubbles.
TIP: Minerals and rocks can completely change their colors by being subjected to UV light or black light. Check out the most common rocks and minerals that glow under UV light:
12 Rocks & Minerals That Glow Under UV Light & Black Light
Step 11: Optical Phenomena
Observe a sample carefully if it has a cat’s eye effect (typical for quartz, chrysoberyl, apatite), asterism (common for rubies and sapphires), does it have pleochroism (tourmalines, tanzanite, iolite), color change effect (alexandrite), or birefringence (calcite, zircon).
These optical phenomena can help you to identify a mineral sample.
Check 23 Main Properties of Rocks & Minerals Explained by Experts to see more minerals that have optical phenomena.
Step 12: Crystal Shape (Habit)
If your mineral sample has some even crystal faces or is a well-formed crystal, observe it attentively. Crystal habit can tell you the mineral species:
- Cubic form is typical for fluorite and pyrite
- Octahedron – for spinel, diamond, magnetite, and fluorite.
- Dodecahedron – for garnets
- Rhombohedral (tilted cube) and scalenohedron are typical for calcite
- Hexagonal – typical for beryls (emerald, aquamarine, heliodorus)
Step 13: Mineral associations
Sometimes mineral associations can be a game-changer. For example, lazurite and azurite both are blue minerals that usually occur as aggregates. Lazurite usually occurs together with golden specks of pyrite and white crystals of calcite, while azurite is commonly associated with malachite.
Step 14: Results
All these steps will help you to identify minerals or at least narrow down possible candidates and to decide on a group of minerals (oxides, sulfides, halides, silicates).
You can use the next resources to compare your obtained results and observations with tables of possible mineral candidates:
TIP: Do you know the difference between precious and semi-precious stones? Precious and semi-precious stone terms are surrounded by feelings of beauty, brilliance, and wealth. Find out more in the article below:
Precious & Semi-Precious Gemstones: Explanation & Difference
Bonus! The Most Common Minerals Identification Tips
Here is a table with a list of very common minerals and their typical characteristics, which help to identify a sample quickly.
For example, pyrite’s unique properties that differ from any other minerals are metallic luster, greenish-black streak, and cubic shape of crystals.
| Mineral | Typical Characteristics |
|---|---|
| Quartz | Hardness: 7 Crystal Shape: Hexagonal prism with pyramid |
| Mica | Cleavage: Perfect mineral peels when rubbed Crystal Shape: Flakes |
| Pyrite | Luster: Metallic Streak: Greenish-black Crystal Shape: Cubic |
| Gypsum | Hardness: Can be scratched by a fingernail |
| Calcite | Cleavage: Perfect in three directions Luminescence: Glow under UV light Crystal Shape: Rhombohedral (tilted cube) |
| Fluorite | Luminescence: Glow under UV light Crystal Shape: Cubic Octahedron |
| Magnetite | Luster: Metallic Streak: Black Magnetism: Attracts a magnet Crystal Shape: Octahedron |
| Hematite | Luster: Metallic Streak: Red |
| Galenite | Luster: Metallic Specific Gravity: Heavy Streak: Gray |
| Lazurite | Mineral Association: In association with calcite and pyrite |
| Azurite | Mineral Association: In association with malachite |
Conclusion
Making an identification of minerals with discussed step-by-step instructions is easy and amusing. The approach is based on:
- testing the physical properties,
- the morphology of crystals,
- and minerals association.
Hardness, luster, cleavage, color, transparency, streak, fracture, and specific gravity are the main physical properties for mineral identification in the field or at home.
Optical phenomena, magnetism, luminescence, and reaction with acid can also come in handy with some kinds of crystals.
Note: This article is written by gemologist expert Olena (LinkedIn profile). She is a Ph.D. candidate (Mineralogy) holding an Applied Jewelry Professional diploma from GIA (Gemological Institute of America).
TIP: So you already know how to identify minerals. What about starting to find minerals on your own? Check out the ultimate guide on starting rockhounding in the article below:
How to Start Rockhounding: The Ultimate Beginner’s Guide